Choosing a self-service kiosk for your retail store sounds simple. In reality, it’s one of the most consequential technology decisions you’ll make.
I’ve spent years deploying kiosks across retail environments in the U.S. and Latin America. As a result, I’ve seen every version of this decision, the ones that transformed operations, and the ones that turned into expensive dust collectors.
The difference rarely comes down to the hardware itself. Instead, it comes down to how well the retailer understood their own needs before they bought anything.
This guide walks you through every factor you need to evaluate before purchasing a self-service kiosk. More importantly, it’s based on real deployment experience, not vendor brochures.
Why Self-Service Kiosks Matter for Retail in 2026
Before diving into how to choose, let’s briefly cover why this matters now.
Consumer expectations have shifted dramatically. According to recent industry data, customers who use self-service kiosks typically spend 10–30% more per transaction than those who order from staff. Furthermore, 60% of American consumers have already used self-service kiosks.
However, here’s what the stats don’t tell you: 67% of those same consumers say the technology malfunctioned during checkout. In other words, the opportunity is massive but only if the execution is right.
That’s exactly why choosing the right kiosk matters more than simply deploying one.
Step 1: Define Your Use Case First
This is where most retailers go wrong. They start by browsing kiosk catalogs instead of answering a fundamental question: what specific problem are you solving?
There are several common use cases for self-service kiosks in retail, and each one requires different hardware and software configurations.
Self-checkout is the most common use case. Customers scan, pay, and bag their items independently. As a result, this reduces checkout lines and frees staff to focus on higher-value tasks. For this to work, you’ll need a barcode scanner, a payment terminal, a receipt printer, and, potentially, a scale.
Self-ordering works particularly well in food service and QSR environments. Customers browse a digital menu, customize their order, and pay at the kiosk. Consequently, order accuracy increases, and average ticket size rises.
Endless aisle allows customers to browse and purchase inventory that isn’t physically in the store. This is especially useful for retailers with limited floor space but a large online catalog. In this case, the kiosk needs a strong internet connection and integration with your e-commerce platform.
Price checking and product information are simpler use cases. Customers scan a barcode to check prices, find product details, or locate items in-store. Because of its simplicity, this requires less hardware but still demands a clean user interface.
Check-in and loyalty programs involve kiosks that handle customer registration, loyalty enrollment, and appointment check-ins. This configuration typically requires a simple touchscreen and, optionally, a card reader.
Before contacting any vendor, clearly identify which use case best matches your store’s needs. If you’re unsure, start by asking your floor staff which tasks take up most of their time with customers.
Step 2: Choose the Right Hardware Configuration
Once you know your use case, you can make informed hardware decisions. There are three main form factors to consider, and each has distinct advantages.
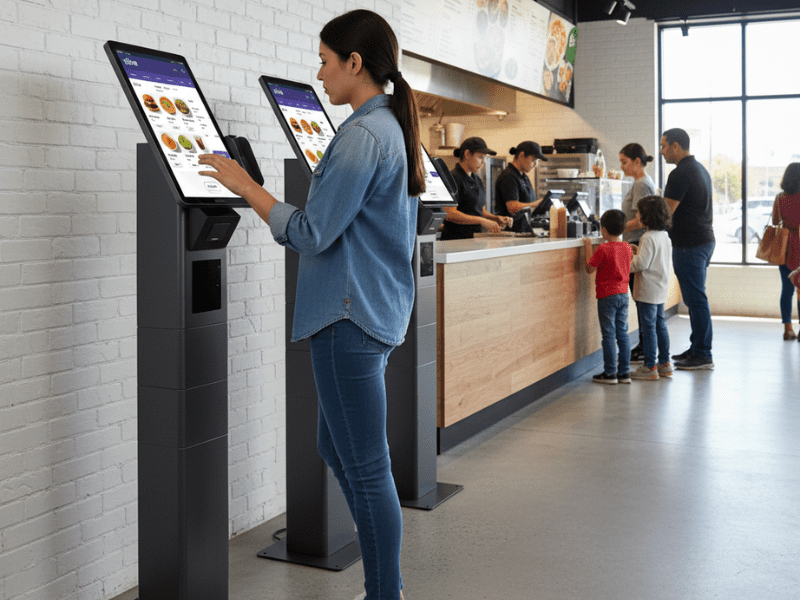
Floor-standing kiosks are the most visible option. They work best in high-traffic areas where customers are likely to notice and approach them. Specifically, these are ideal for self-checkout, self-ordering, and endless aisle applications. On the other hand, they require more floor space and a higher initial investment.
Countertop kiosks integrate into existing service areas. As a result, they work well in environments where customers already interact at a counter, like pharmacies, bakeries, or hotel retail shops. These tend to cost less and take up minimal space.
Wall-mounted kiosks deliver full functionality without using any floor space. Therefore, they’re perfect for narrow corridors, smaller retail stores, or areas where maintaining clear walkways is important.
Beyond form factor, you need to evaluate these specific hardware components:
Screen size directly affects usability. For self-checkout and ordering, 15″ is the minimum. However, 22″ screens significantly improve the customer experience, especially for older or less tech-savvy users. In contrast, price-checking kiosks can work well with smaller screens.
Touchscreen quality matters more than you think. Resistive screens are cheaper but less responsive. Capacitive screens (like your smartphone) feel more natural. For a retail environment with high daily usage, always choose capacitive.
Payment terminals should support credit/debit cards, contactless payments (Apple Pay, Google Wallet), and NFC. Additionally, consider whether your market still requires cash handling. This is especially relevant in Latin American deployments where cash remains common.
Durability is non-negotiable. Retail kiosks endure thousands of touches daily, temperature changes, accidental impacts, and sometimes intentional misuse. Consequently, look for commercial-grade hardware with a minimum 4-year manufacturer support commitment.
Step 3: Evaluate Software and POS Integration
Here’s a truth most kiosk vendors won’t tell you: the hardware is the easy part. The software is where deployments succeed or fail.
Your kiosk software needs to integrate seamlessly with your existing POS system. Without this integration, you end up with disconnected data. The kiosk processes a sale, but your inventory doesn’t update. As a result, you create more problems than you solve.
When evaluating kiosk software, consider these critical factors:
POS integration should be real-time. Transactions at the kiosk must sync instantly with your main POS. Otherwise, you’ll face inventory mismatches and reconciliation nightmares. Ask vendors specifically: Does this integrate with my existing POS, and is the integration real-time or batch?
Menu and catalog management should allow remote updates. You need to change prices, add products, and launch promotions without physically touching each kiosk. Centralized content management is essential, especially if you plan to scale beyond a single location.
Offline capability is frequently overlooked. Retail internet connections fail. When they do, your kiosk shouldn’t become a blank screen. Instead, look for software that caches product data locally and can process basic transactions offline, then sync when the connection returns.
User interface design directly impacts adoption. A kiosk running your website is not a kiosk solution; it’s a bad user experience on a big screen. The interface must be optimized for large-format touch, with big buttons, clear navigation, and minimal steps to complete a transaction.
ADA compliance is legally required in the U.S. Both the hardware and the software must be accessible to users with disabilities. This includes screen readability, height requirements, and audio options. Many retailers overlook this, which creates significant legal exposure.
For a deeper look at how POS integration works in practice, I cover this extensively in my book How to Implement Self-Service Without Failing.
Step 4: Plan Your Placement Strategy
Where you put the kiosk is just as important as which kiosk you buy. I’ve seen technically excellent kiosks fail simply because they were placed in the wrong spot.
Visibility is everything. If customers can’t see the kiosk, they won’t use it. Place kiosks along natural traffic flows near entrances, at the end of aisles, or adjacent to checkout areas. In addition, use clear signage that explains the kiosk’s purpose. A simple “Order Here” or “Self-Checkout” sign dramatically increases adoption.
Accessibility matters. Ensure the kiosk is reachable for wheelchair users and complies with ADA height requirements. Also, make sure there’s enough space around the kiosk for comfortable use. Nobody wants to enter payment information while someone stands directly behind them.
Power and connectivity are practical considerations that catch many retailers off guard. Each kiosk needs a power outlet and a stable network connection. Consequently, work with your facilities team early in the process to identify locations that support both requirements without expensive electrical work.
Staff proximity is something I always recommend. Especially during the first few months after deployment, position the kiosks within staff members’ sight. Customers will need help, and visible assistance reduces abandonment. In fact, in one deployment I managed, having a trained staff member near the kiosk during the first 30 days reduced abandonment by one-third.
Step 5: Calculate Your True Cost of Ownership
The sticker price of a kiosk is just the beginning. To make a sound investment decision, you need to understand the total cost of ownership over 3–5 years.
Hardware cost is the most visible expense. Depending on the configuration, expect to pay between $2,000 and $6,000+ per unit for commercial-grade retail kiosks. Floor-standing units with integrated payment terminals and printers sit at the higher end of this range, while countertop models with basic configurations start closer to the lower end.”
Software licensing is typically a monthly or annual fee. This includes the kiosk application, POS integration, and content management. Budget $50–$200 per kiosk per month, depending on the complexity of your deployment.
Installation includes physical mounting, electrical work, network setup, and initial configuration. For a single location, this might cost $500–$1,000 per unit. However, for multi-location rollouts, installation costs per unit tend to decrease.
Maintenance and support cover hardware repairs, software updates, and technical support. Some manufacturers include 1–2 years of support in the purchase price. After that, expect to pay for an extended support agreement. Always ask about the manufacturer’s support timeline. A 4+4 model (4 years of active support plus 4 years of extended support) is the current industry standard.
Training is the cost most retailers forget. Your staff needs to know how to operate, troubleshoot, and assist customers with the kiosk. Without this investment, even the best hardware will underperform. I recommend budgeting 2–3 days of hands-on training per location.
Step 6: Avoid the Most Common Mistakes
After deploying kiosks across multiple markets, I’ve identified the patterns that consistently lead to failure. Avoid these, and you’ll be ahead of most retailers.
Mistake 1: Choosing the cheapest option. Budget kiosks fail faster, deliver worse user experiences, and cost more in the long run due to maintenance and replacement costs. Instead, invest in commercial-grade hardware that will last 4–5 years.
Mistake 2: Skipping the pilot. Never roll out kiosks to every location at once. Instead, pilot in 1–3 stores for at least 60–90 days. Gather data on adoption rates, transaction volumes, and customer feedback before scaling.
Mistake 3: Ignoring staff training. Kiosks don’t replace staff; they redirect staff to higher-value work. However, if your team doesn’t understand the kiosk or resents it, adoption will suffer. Train your team to see kiosks as tools that improve their jobs, not threats.
Mistake 4: No adoption strategy. Simply installing a kiosk doesn’t mean customers will use it. You need signage, incentives (such as a small discount on kiosk orders), and staff who actively encourage first-time use. Without these, kiosks become expensive furniture.
Mistake 5: Forgetting about updates. Your kiosk software needs regular updates, new features, security patches, and integration improvements. Choose a vendor that provides a clear update roadmap and doesn’t charge excessive maintenance fees.
I wrote extensively about these failure patterns and how to overcome them in How to Implement Self-Service Without Failing. If you’re serious about getting this right, it’s the most practical resource available.
The Future: AI and Agentic Commerce in Kiosks
Looking ahead, the self-service kiosk is evolving beyond simple transaction processing. AI-powered kiosks are beginning to offer personalized product recommendations, dynamic pricing, and even conversational interfaces.
This shift aligns with the industry’s term agentic commerce, in which AI agents act on behalf of consumers to discover, evaluate, and purchase products. As a result, today’s kiosk isn’t just a checkout device. Instead, it’s becoming an intelligent retail touchpoint.
When choosing a kiosk today, think about tomorrow. Specifically, ask vendors about their AI roadmap, their ability to integrate with emerging agentic commerce platforms, and how their hardware supports future software upgrades.
The retailers who invest in adaptable, future-ready kiosk infrastructure now will have a significant advantage as AI transforms physical retail.
Frequently Asked Questions
Look at three things most vendors won’t highlight: their support timeline (how many years of guaranteed service), their deployment track record in your specific retail segment, and references from retailers of similar size. Additionally, ask about their update roadmap. A vendor that hasn’t released a major software update in 12+ months is a red flag. Finally, test their response time by submitting a support ticket before you buy. That tells you more than any sales presentation ever could.
One of the most common failure patterns I’ve seen involves retailers who installed kiosks without training their staff. As a result, employees saw the kiosks as threats rather than tools and actively discouraged customers from using them. On the other hand, a successful deployment I managed included a role-play training program where staff practiced guiding customers through the kiosk. That single change reduced kiosk abandonment by one-third within the first month. I cover many more real-world cases in my book How to Implement Self-Service Without Failing.
For a single location, plan for 8–12 weeks from vendor selection to go-live. That includes 2–3 weeks for procurement, 1–2 weeks for installation and configuration, 1 week for staff training, and 4–6 weeks for a pilot period. For multi-location rollouts, add 2–4 weeks per additional wave of stores. Most importantly, don’t skip the pilot. Rushing to full deployment is one of the top reasons kiosk projects fail.
Yes. The three most common surprises are: payment processing fees that differ from your main POS (always confirm the per-transaction rate), software update fees after the initial licensing period ends, and peripheral replacement costs, as receipt printers and barcode scanners wear out faster than the main unit. Furthermore, budget for occasional screen replacements and cleaning supplies specifically designed for commercial touchscreens.
Start with clear signage that explains the benefit (“Skip the line order here”). In addition, offer a small incentive to first-time kiosk users, such as a 5% discount or a free item. Position a staff member near the kiosk during the first 30 days to assist without taking over. Above all, make sure the first screen of the kiosk interface is welcoming and simple. If a customer has to read instructions before they can start, you’ve already lost them.
About the Author: Adriana Rivas is a retail technology strategist, author of How to Implement Self-Service Without Failing, and founder of Biwitech. She helps retailers navigate digital transformation and implement cutting-edge technologies that drive measurable business results.

Leave a Reply